How To Paint Your 3D Printed Parts
What makes the difference between a simple fit and function prototype and a beautiful showcase model ready to lead the next Kickstarter success? You got it, the paint job.
At first glance it might seem a pretty complicated process involving industrial equipment and expert craftsmanship but today we want to show you how, with a bit of patience and elbow grease, you can transform that boring ABS print into a beautifully finished part.
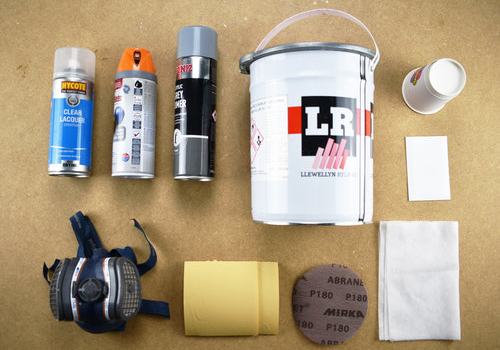
WHAT YOU WILL NEED
– FILLING PRIMER
We suggest a good quality acrylic primer, for our model we’ve chosen a basic automotive primer easy to sand and pretty cheap to buy from any DIY store or Amazon.
– BASECOAT PAINT
Depending on the look you want to achieve you can choose between matte, glossy or special effect finishes. In our case we are going for a glossy orange from Amazon. When picking your basecoat don’t go for the cheap deal, a couple of pounds spared on your paint could compromise the full project.
– CLEAR COAT
We recommend a one component acrylic clear coat, easy to use and with a lower VOC content compared to automotive and industrial finishes.
– WET/DRY SAND PAPER
This is often overlooked but the quality of the sandpaper is very important to get consistent results every time. It’s good to keep various grits at hand usually from 180 up to 600/800. The coarser grades can be used dry but the finer ones work better when used wet.
– TACK CLOTH
You will need to clean your model the process and a tack cloth is perfect to remove dusts in between sanding stages.
– AUTOMOTIVE FILLER
Even when printing with a fine resolution some layer lines will still be visible, a good automotive filler covers any defect before applying primer and paint.
You can find a good polyester filler from fiberglass and car repair shops.
– NITRILE GLOVES
Always handy to keep in the workshop especially when working with chemicals and paints.
– CARBON FILTER MASK
This is a must when working with paints and solvents, do not buy a paper disposable mask but invest in a good kit that will adapt to your features. Remember to change the carbon filters roughly every month if used often.
Now the fun part, let’s start preparing your model.

STEP 1 – SANDING
Starting from a 180 grit sandpaper work your way up to 400. Use circular motions to avoid visible scratches on the surface of your model.
This is by far the most time consuming part of the entire process but the final result depends greatly on this stage.
TIP: A small orbital sander can do miracles and make you spare precious time, even a cheap brand from your local DIY store can speed up this step massively.
Keep sanding until the full model feels smooth to the touch, don’t worry about the deeper layer lines at the moment.

STEP 2 – FILLER
Mix a small quantity of filler and hardener on a piece of scrap paper or board material.
Apply the filler in thin passes to cover the build lines and any defect on the model.
TIP: work with a very small quantity of filler at a time, depending on the ambient temperature it can dry up pretty quickly sometimes leaving you with a big blob of unused material to throw away.

STEP 3 – SANDING THE FILLER
Once the filler is completely dry sand down any excess with 400 grit wet sandpaper. Repeat the last two steps until the model feels completely smooth to the touch.


STEP 4 – PRIMER
Mount your model onto a support to facilitate this stage. Shake the primer for a couple of minutes and start spraying the model with a lateral movement from side to side keeping a distance of roughly 10-12 inches.
The first two coats should be very light we are not looking to cover the model but promote the adhesion for the successive layers.
The third and fourth passes should be wet but be careful to avoid sagging and dripping, keep moving side to side and leave 5-10 minutes in between coats.

STEP 5 – SANDING THE PRIMER
It’s good practice to lightly sand your model after priming, the smoother the surface at this point, the better the results will be.
IMPORTANT: wipe the model clean with a tack cloth before proceeding to the next step.

STEP 6 – BASECOAT
To apply the basecoat follow the same guidelines outlined in STEP 4 with two light coats to start and three or four wet passes to finish, wait 5-10 minutes in between to avoid sagging.
If your model requires any masking remember to remove the tape right after painting to ensure clean sharp edges between the colours.
Let the paint dry overnight and clean the part in the morning with a tack cloth.
STEP 7 – CLEARCOAT
Apply 1 or 2 light coats of clear coat waiting 10 minutes in between passes.
Depending on the look you want to achieve you can further polish the surface with wax or a fine polishing compound to get a super glossy finish.


