Stunning 3D Prints For Less
Nowadays is common belief that 3D printing is an expensive process and if you want something done for a reasonable price don’t expect a quality product, NOT ANYMORE. Today we want to show you how, with the right choice of material, design and post processing, you can achieve outstanding results for less with our online service.
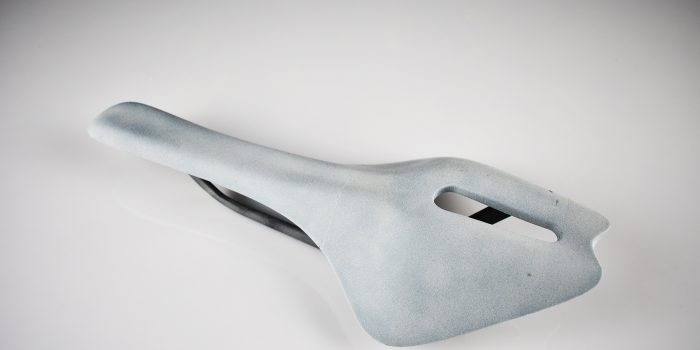
To keep things real we have designed a model for this demonstration, a prototype of a bike saddle. At first impression our model is a candidate for Nylon SLS technology due to the fairly complex shape but a quick run of quotes on the net and the cheapest printing bureau on the market would make our pocket lighter of a whopping £400.00 plus delivery. Following this guide you can reduce the printing costs by more than 400% compared to a standard SLS 3d printing service, impressed? Let’s see how to do it.
STEP 1: CHOOSE MATERIAL AND PRINTING PROCESS
It’s important to start with the end in mind, your design should direct you to the right material and printing process. ABS and engineering plastics are great for the majority of projects, have a look at our materials and pick the right one for your application.
FDM or fused deposition modelling remains the cheaper option by far, but what about the print quality? Worry not, in the next steps we’ll show you how to work around the most common limitations of this technology and most important, keep the bill down.

STEP 2: DESIGN FOR 3D PRINTING
The first thing we’ll be taking in consideration is the size of our model. In this case the longer side of the saddle would stick out the printer platform so we will be splitting the model roughly in the center. To make things easier during the re-assembling we recommend adding pins to your design, this will help a lot to get a perfectly aligned part.
The model also incorporates a couple of rods on the underside of the saddle, we could print this together with the main body but that would require a lot of support material and result in poor surface quality, instead we will be designing these parts as separate components and join them to the main body once printed.

STEP 3: ASSEMBLY
It’s time to join our parts, there are many options out there but we like to use ABS paste or epoxy for the most demanding applications.
Test fit the various components before applying the adhesive, the contact surface needs to be clean and flat, remove any excess material with a sharp knife or a scalpel.
To keep the parts in place during this process we recommend using clamps or straps, if you’re going for a quick drying adhesive you can just hold the model with your hands for a few minutes.
TIP: In some cases it’s easier to sand and paint your components before joining them together. For this model we have joined the main body and added the supporting rods after post processing.

STEP 4: FINISHING
Once the adhesive is dry we can start sanding the model paying particular attention to the joints. At this point we could paint the model but in this case we are looking for a satin finish and quick sandblasting it’s just what we need.
As you can see it’s easy to design beautiful models on a budget. Whether you’re a hobbyist or an experienced model maker we are here to help, get in touch with us or order a print by clicking here

